

Leather glue is a simple and useful tool for leather crafting or repair, but it can also have some problems. This comprehensive guide will illuminate the path to fixing common problems with leather glue, ensuring your cherished leather possessions continue to shine with their inherent grace.
What If Leather Glue Not Sticking
One of the most common problems you might encounter is the glue failing to stick to the leather surface. This could be due to several reasons, including a dirty surface, incorrect application, or an unsuitable type of adhesive.
To fix this, start by ensuring that the leather surface is clean and dry. Use a leather cleaner or mild soapy water to clean the area, and then let it dry completely.
If the gluing surfaces are too smooth, you can sand them down so the glue has something to grab onto.
If the problem persists, you might be using the wrong type of glue. Not all adhesives are suitable for leather. Some may not penetrate deep enough into the fibers, while others might be too harsh and damage the leather. For leather repairs, use an adhesive specifically designed for leather, such as a professional-grade leather glue.
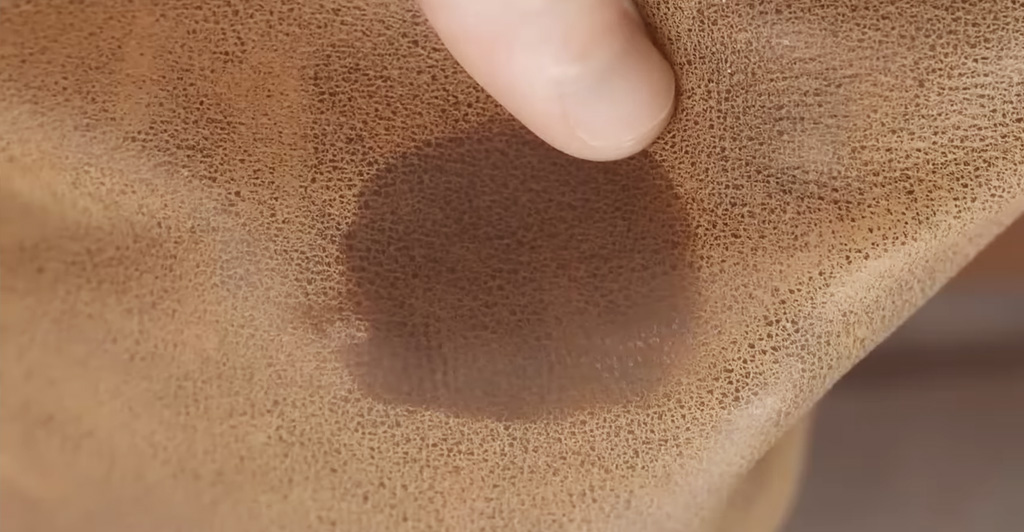
What If Leather Glue Leaving Stains
Another issue that might occur is the glue leaving stains or residue on the leather. This not only affects the aesthetic appeal of the item but can also lead to further damage if not addressed promptly.
The key to avoiding this problem is precision. Apply the glue sparingly and only in the area where it’s needed. If you do end up with glue stains, act quickly. Use a clean, damp cloth to gently wipe off the excess glue. If the glue has dried, a specialized glue remover or rubbing alcohol can be used to clean the area. However, always test these on an inconspicuous part of the leather first to ensure they won’t cause discoloration.
What If Leather Glue Drying Out
Leather glue, like many adhesives, can dry out if not stored correctly. This can render the glue unusable and waste your investment.
The solution here is proper storage. Keep your leather glue in a cool, dry place away from direct sunlight. Make sure the cap is tightly secured after each use to prevent air from getting in and drying out the glue. If your glue has already dried out, unfortunately, there’s not much you can do to restore it. The best course of action is to replace it with a fresh bottle.
What If Leather Glue Not Drying
On the flip side, another prevalent issue is leather glue taking too long to dry or not drying at all. This could be due to applying too much glue, not providing enough time for the glue to cure, or using glue that’s expired or of inferior quality.
The first step is to always check the expiration date before using the glue. Expired or poor-quality glue might not dry properly. If the glue has not expired, you might have applied too much. Remember, when it comes to leather glue, less is often more. Apply a thin, even layer to both surfaces and press them together.
Make sure you’re giving the glue enough time to cure. The curing time can vary depending on the brand and type of glue, so always check the manufacturer’s instructions. A good rule of thumb is to allow at least 24 hours for the glue to fully cure. If you’re working in a humid environment, it might take even longer.
What If Leather Glue Causing Stiffness
Leather is prized for its flexibility and soft texture. However, some people find that after repairing a tear or seam with leather glue, the area becomes stiff or hard.
To prevent this, make sure you’re using a flexible leather adhesive. These adhesives are designed to maintain the leather’s natural flexibility after they cure. When applying the glue, spread it evenly and thinly across the surface. Too much glue can result in a stiff, uncomfortable patch.
Also, consider using a leather conditioner after the glue has fully cured. This will help to restore the suppleness of the leather and blend the repaired area with the rest of the item.
What If Leather Glue Altering the Leather’s Color
Sometimes, you might notice a slight alteration in the leather’s color after applying leather glue. This can be quite bothersome, especially if the change is noticeable or the leather item is of significant value.
The best way to prevent this is by doing a patch test before applying the glue to a visible area. Apply a small amount of the glue to an inconspicuous area of the leather item and allow it to dry. If there’s a color change, you may need to consider using a different type of adhesive.
Alternatively, certain leather glues are clear and designed not to alter the color of the leather. Using one of these might be the best option if color alteration is a concern.
What If Leather Glue Creating a Shiny Patch
Another common problem is the glue creating a shiny patch on the leather after drying. This can detract from the overall look of the leather item and make the repair noticeable.
If you’re faced with this issue, consider using a mattifying agent. These can be applied after the glue has dried to remove the shiny appearance and blend the repaired area with the rest of the leather.
Also, ensure that you’re not applying too much glue. A thin, even layer is typically all that’s needed for a strong bond. Excess glue can seep out from the edges when you press the leather together, leading to a shiny patch once it dries.
What If Leather Glue Not Holding Over Time
Finally, you might find that the leather glue does not hold over time. The bond might weaken, causing the repaired seam or tear to come apart.
If you’re experiencing this issue, it could be due to a few factors. Firstly, you may not be applying enough glue. While it’s essential to avoid applying too much, applying too little can also lead to a weak bond.
Secondly, you may not be giving the glue enough time to cure. As mentioned earlier, the glue typically needs at least 24 hours to fully cure. Disturbing the bond before it has fully cured can weaken it over time.
Finally, you might be using the wrong type of glue. Ensure you’re using a high-quality leather adhesive that’s designed for the type of repair you’re undertaking. Some glues are better suited for repairing seams, while others are ideal for fixing tears or holes.
Wrapping It Up
In the grand scheme of things, problems with leather glue are usually straightforward to solve. The secret lies in understanding the root cause and then implementing the right solution. Whether it’s choosing the right type of glue, applying it correctly, or knowing how to remove stains, each aspect plays a crucial role in ensuring a successful leather repair.
Leather glue is an indispensable ally in maintaining the longevity and aesthetic appeal of your leather goods. By following this guide, you can navigate any issues that arise and ensure that your leather items continue to exude their timeless charm. Whether you’re a professional craftsman or a DIY enthusiast, understanding how to fix common problems with leather glue is an invaluable skill in your leatherwork arsenal.
Remember, the journey to mastery is a process. With patience, practice, and a bit of knowledge about the intricacies of leather glue, you can transform worn-out leather into a masterpiece, breathing new life into your cherished leather items.
Conclusion
Leather glue is an invaluable tool in the world of leather care and repair, but it’s not without its quirks and challenges. This guide has delved into the depths of the most common issues that can arise when using leather glue and provided clear, detailed solutions to help you navigate these hurdles with ease.
By understanding these common problems and knowing how to fix them, you can ensure that your leather items remain as flawless and durable as the day you bought them. Whether you’re repairing a beloved leather jacket or restoring an antique leather sofa, the knowledge you’ve gained from this guide will help you use leather glue with confidence and finesse.
Remember, patience and practice are key. Don’t be disheartened if your first few attempts aren’t perfect. With time, you’ll master the art and science of using leather glue, and your leather items will thank you for it. After all, there’s something immensely satisfying about breathing new life into a worn-out piece of leather, and with the right skills, you can do just that. Here’s to many successful leather repairs in your future!
FAQ
Can I use regular super glue for leather repairs?
While it might be tempting to reach for your trusty super glue for leather repairs, it’s not recommended. Super glue can make the leather rigid and may also leave behind noticeable residue. Moreover, it’s not designed to withstand the wear and tear that leather items often experience. For the best results, use a glue that’s specifically designed for leather.
Is it safe to use leather glue on all types of leather?
Most leather glues are safe to use on various types of leather, including genuine leather, suede, and faux leather. However, it’s always a good idea to perform a patch test on an inconspicuous area first. Some leather, particularly exotic or untreated varieties, may react differently to the glue.
What should I do if I get leather glue on my skin?
If you accidentally get leather glue on your skin, don’t panic. First, avoid pulling it off as it can take your skin with it. Instead, soak the area in warm soapy water and gently rub until the glue loosens. You can also use an acetone-based nail polish remover, but be sure to moisturize your skin afterward as acetone can be drying.
Can leather glue be used for other materials like fabric or plastic?
Leather glue is designed specifically for leather, which has a unique fiber structure. While it might provide some degree of adhesion on other materials, it’s not guaranteed to hold up as well or for as long. For fabric, fabric glue would be more suitable, and for plastic, a plastic adhesive would be the better choice.
Does leather glue have an expiry date?
Yes, like most adhesives, leather glue does have an expiration date. It’s usually printed on the packaging. Using the glue past its expiration date can result in reduced effectiveness, such as it not sticking properly or taking longer to dry. Always check the expiration date before using the glue to ensure it’s still good to use.


